안녕하세요.
이번 글에서는 transfer learning을 pytorch로 적용하는 방법에 대해서 알아보도록 하겠습니다.
CNN 모델을 training하는 방식에는 2가지가 있습니다.
- Scratch training (learning)
- 자신의 데이터 셋을 기반으로 CNN 모델을 구현하여 학습시키는 방법
- Scratch training을 하려는 경우에는 지난 글("3.CNN 구현")에서 설명한 방식대로 CNN 모델을 구현하고 자신의 데이터셋을 학습시키면 됩니다.
- Transfer learning (← 이번 글에서 설명)
- ImageNet과 같은 데이터셋으로 학습시킨 CNN 모델을 pre-train 모델이라고 합니다.
- Transfer learning은 이러한 pre-train 모델을 이용합니다.
- Pre-trained 모델은 FC layer의 마지막 뉴런 수(=ImageNet 클래스 개수)가 1000 입니다. 그래서, 나의 task가 3개의 class를 분류해야하는 것이라면 FC layer의 마지막 뉴런 수가 3개인 FC layer로 교체해줘야 합니다. (← 자세한 설명은 뒤에서)

그럼 지금부터 transfer learning 적용을 위한 아래 코드들을 하나씩 설명해보도록 하겠습니다.

1. Pre-trained model 다운받기
from torchvision import models
앞선 글("1.Data Load(Feat. CUDA)")에서 torchvision이 크게 3가지 기능을 제공한다고 언급했고, 이 중 2가지인 transforms와 datasets에 대해서 설명드린바 있습니다.
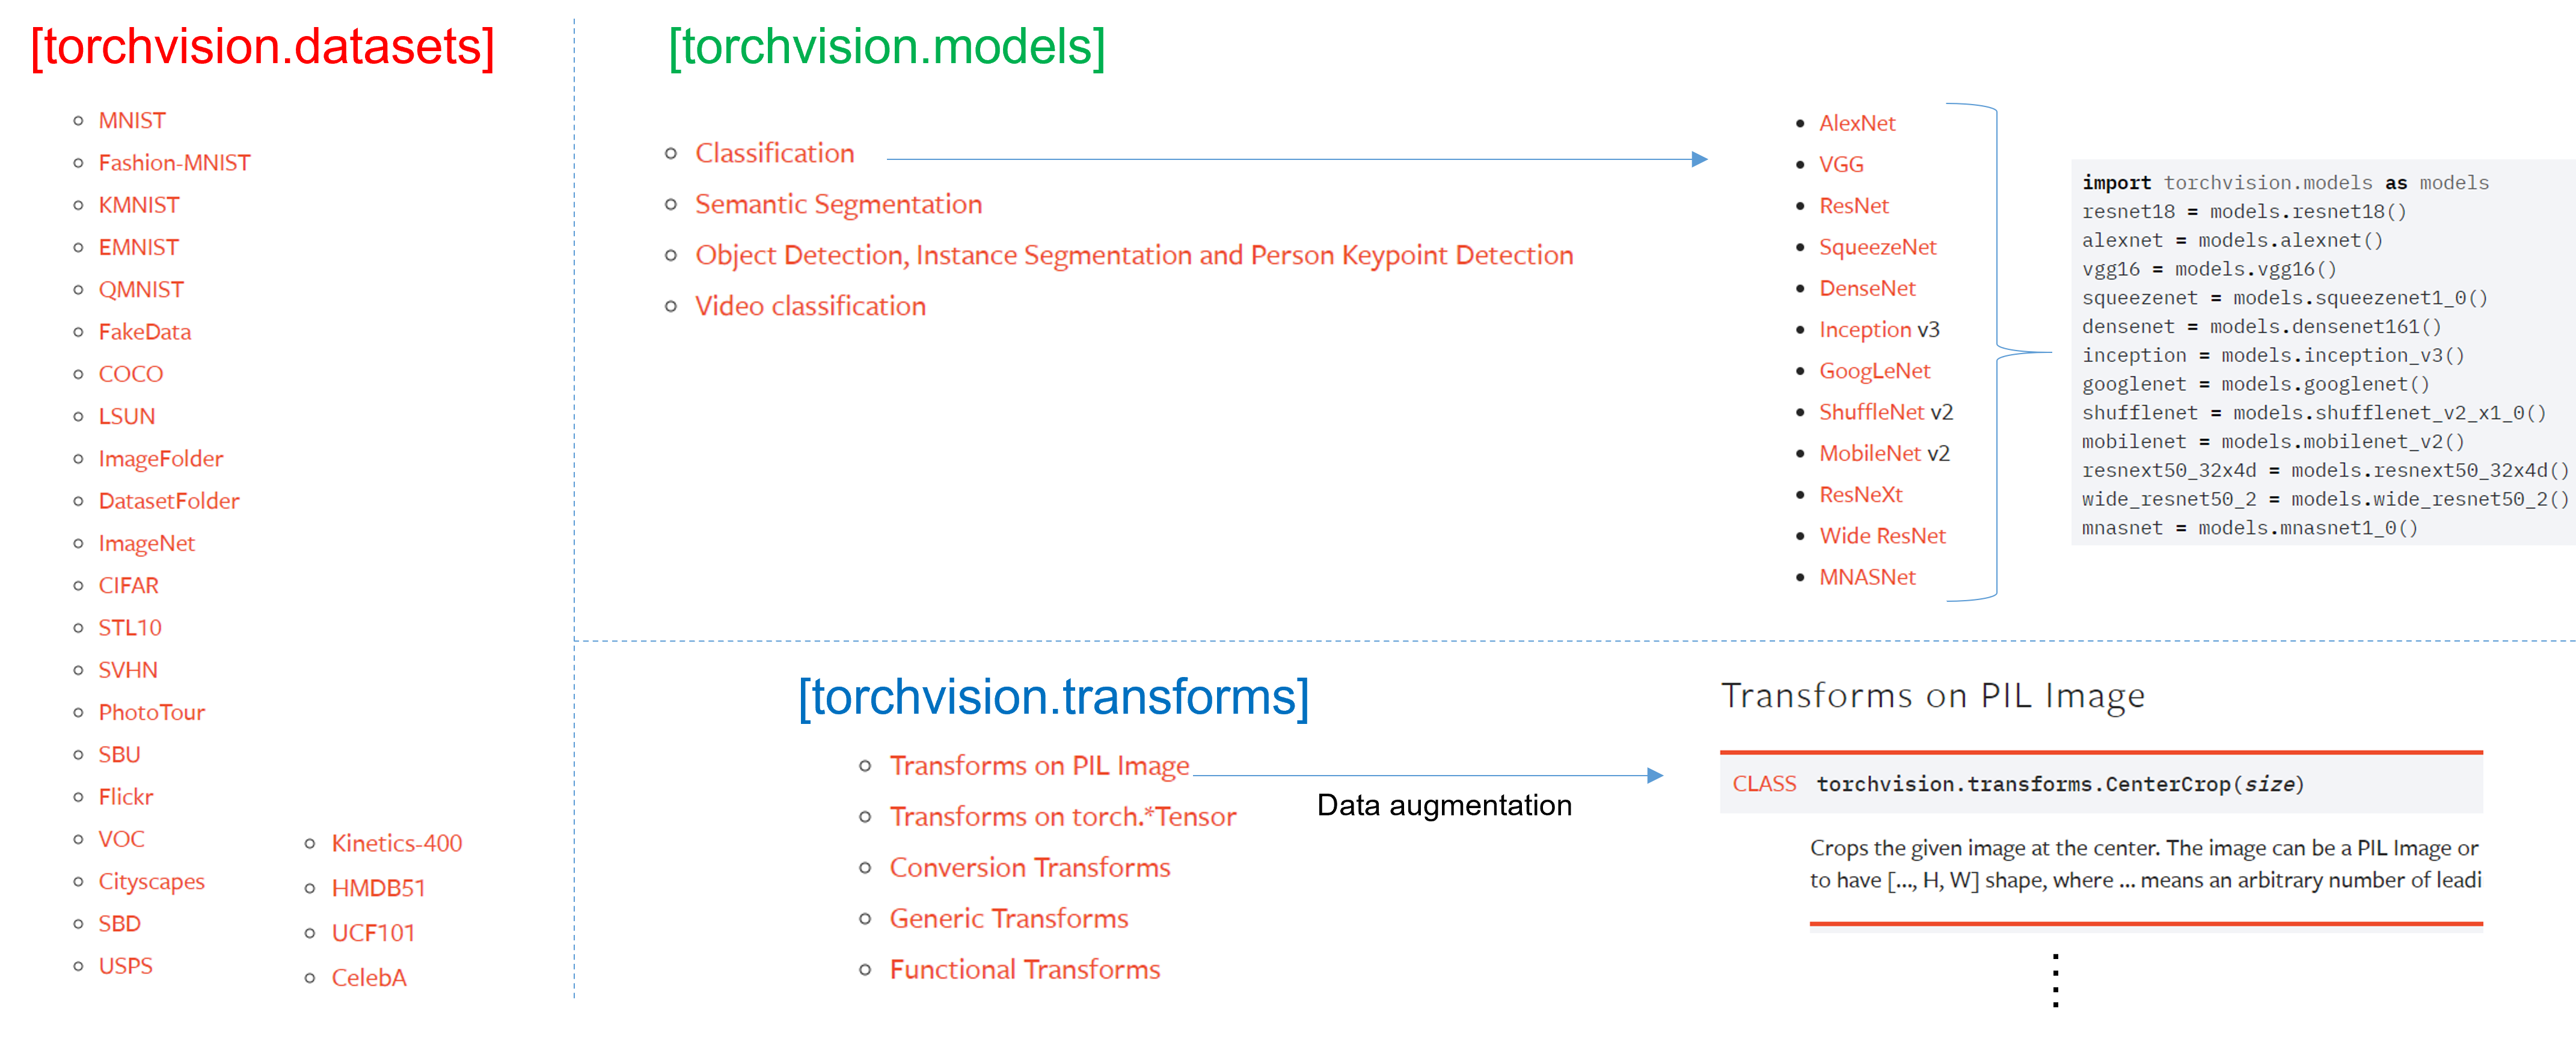
이번 글에서는 torchvision의 또 다른 기능인 models에 대해 설명드리도록 하겠습니다.
torchvision.models 패키지는 다양한 이미지 task 분야 (ex: classification, dobject detection, segmentation, etc)의 pre-trained 모델을 제공해주고 있습니다.
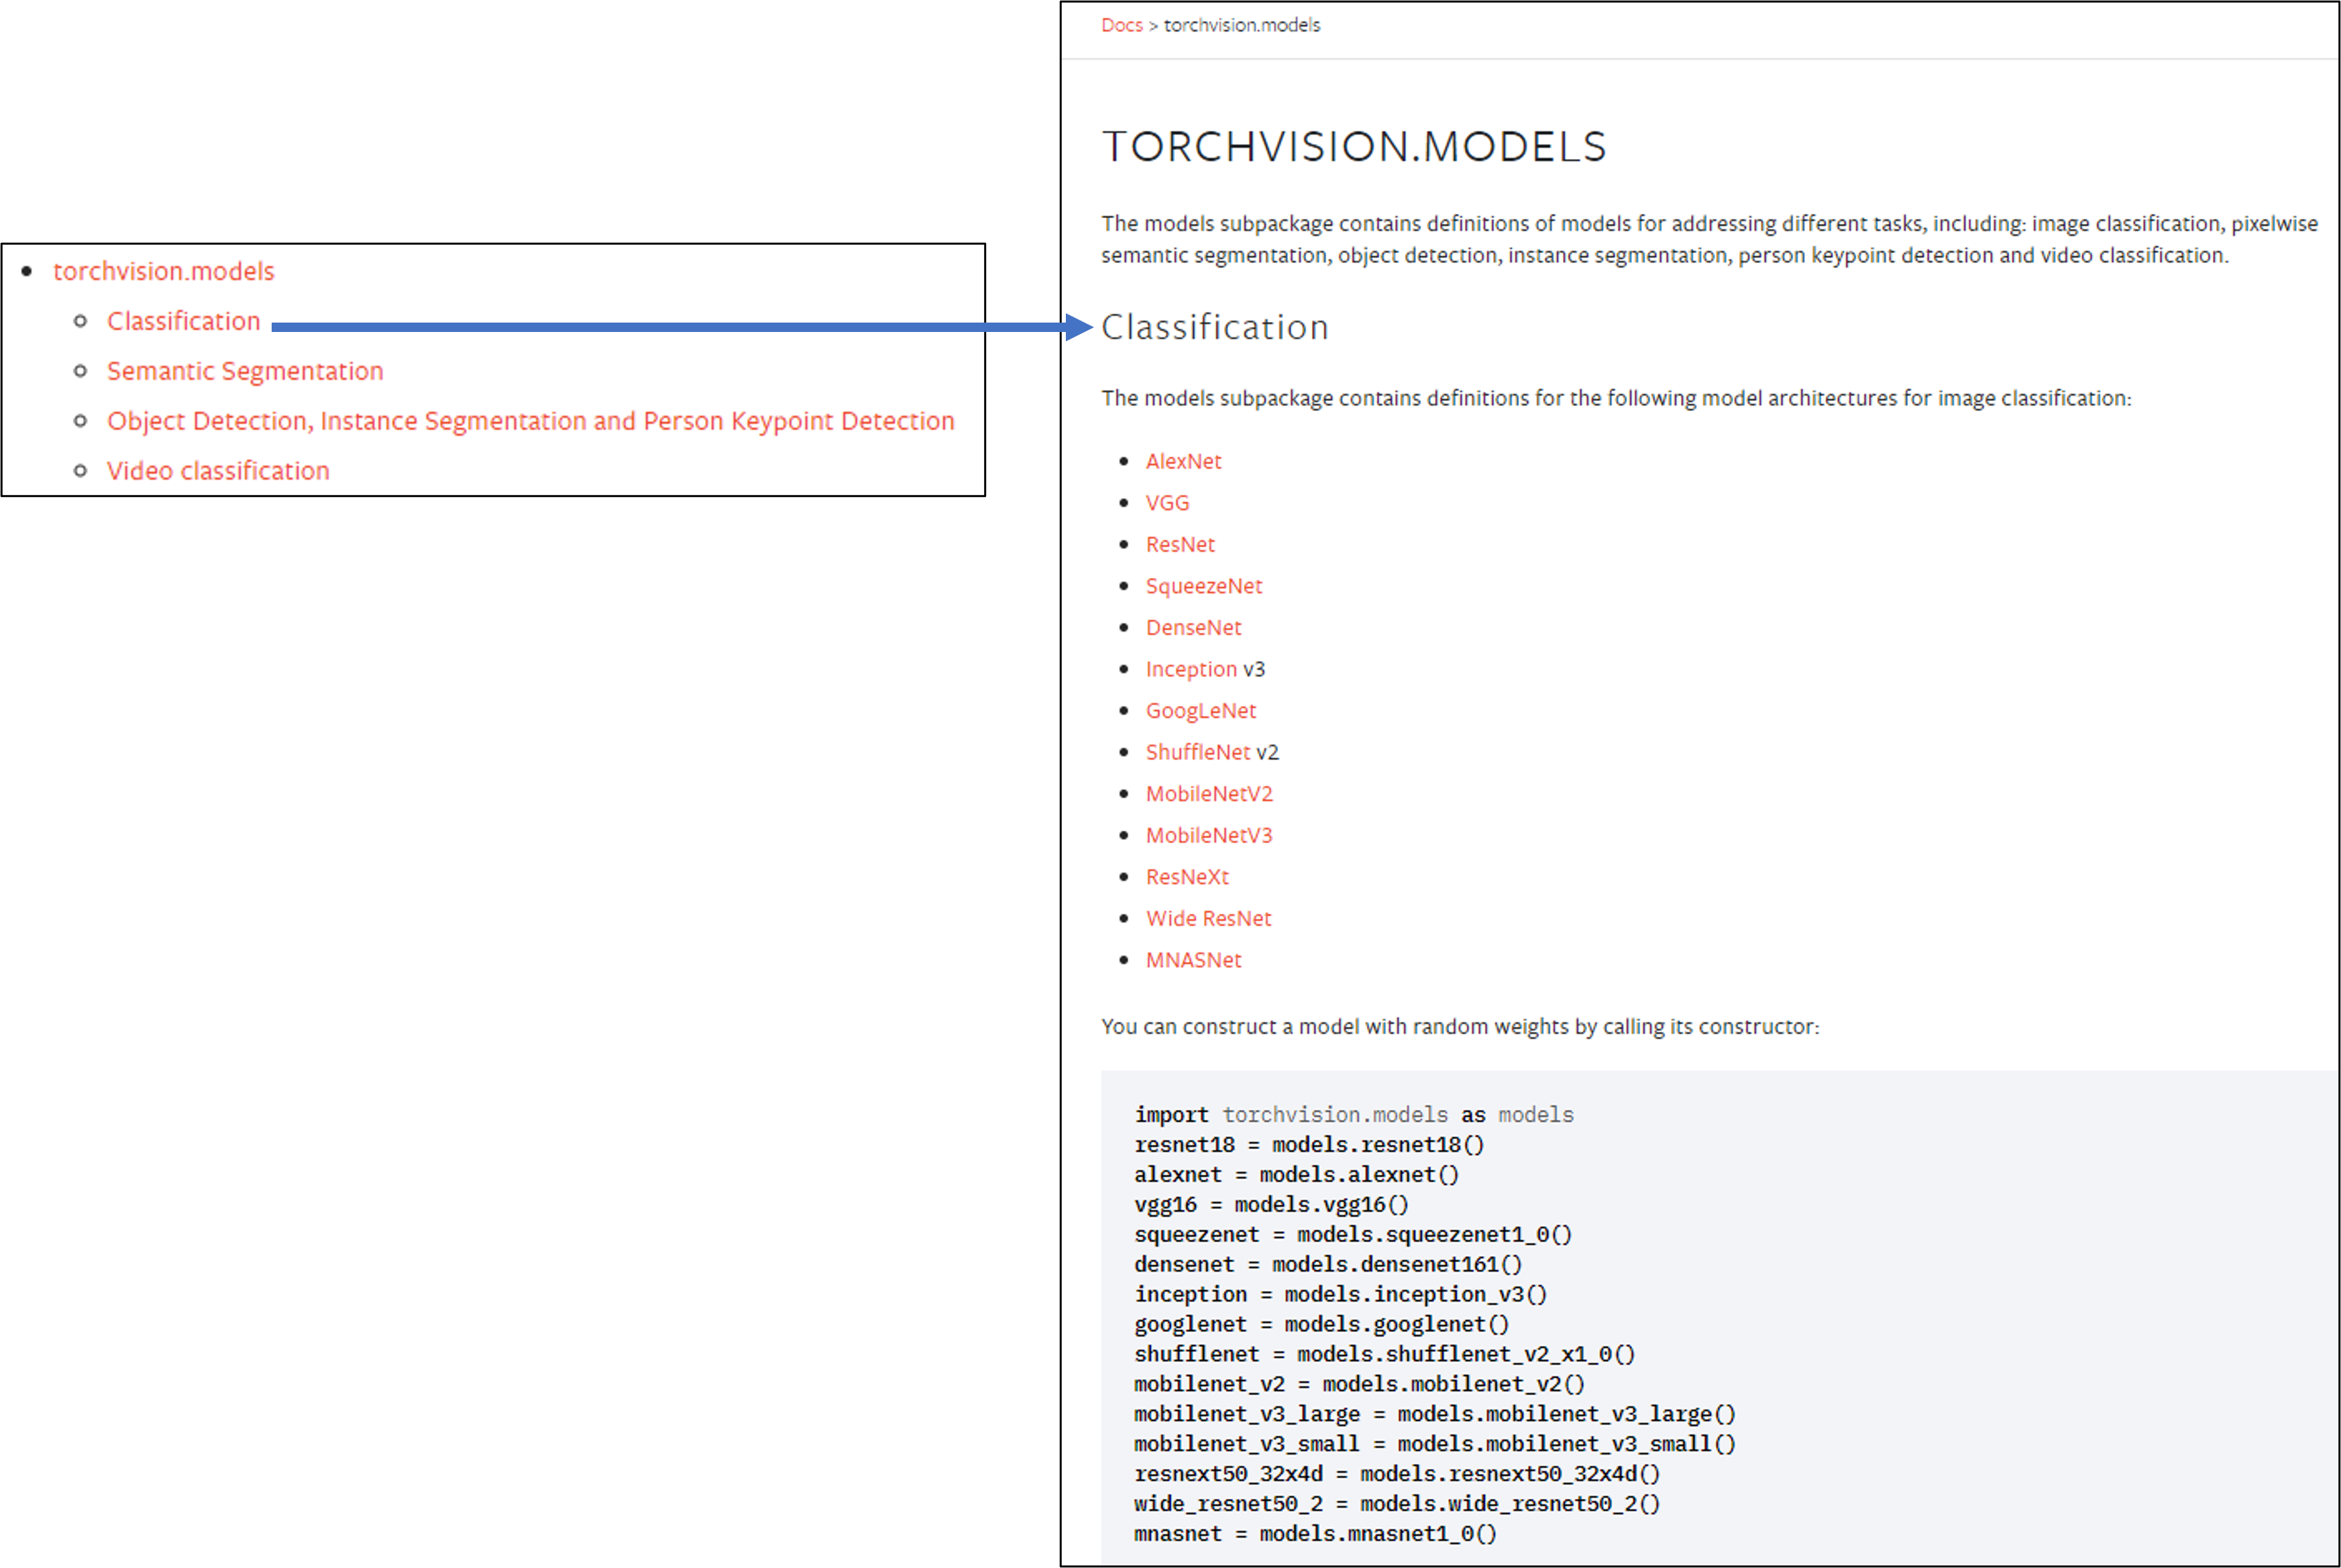
(↓↓↓classification pre-trained model을 제공해주는 torchvision↓↓↓)
https://pytorch.org/vision/stable/models.html#classification
torchvision.models — Torchvision 0.10.0 documentation
torchvision.models The models subpackage contains definitions of models for addressing different tasks, including: image classification, pixelwise semantic segmentation, object detection, instance segmentation, person keypoint detection and video classific
pytorch.org
아래 코드를 입력하면 pre-trained model이 다운받아집니다.

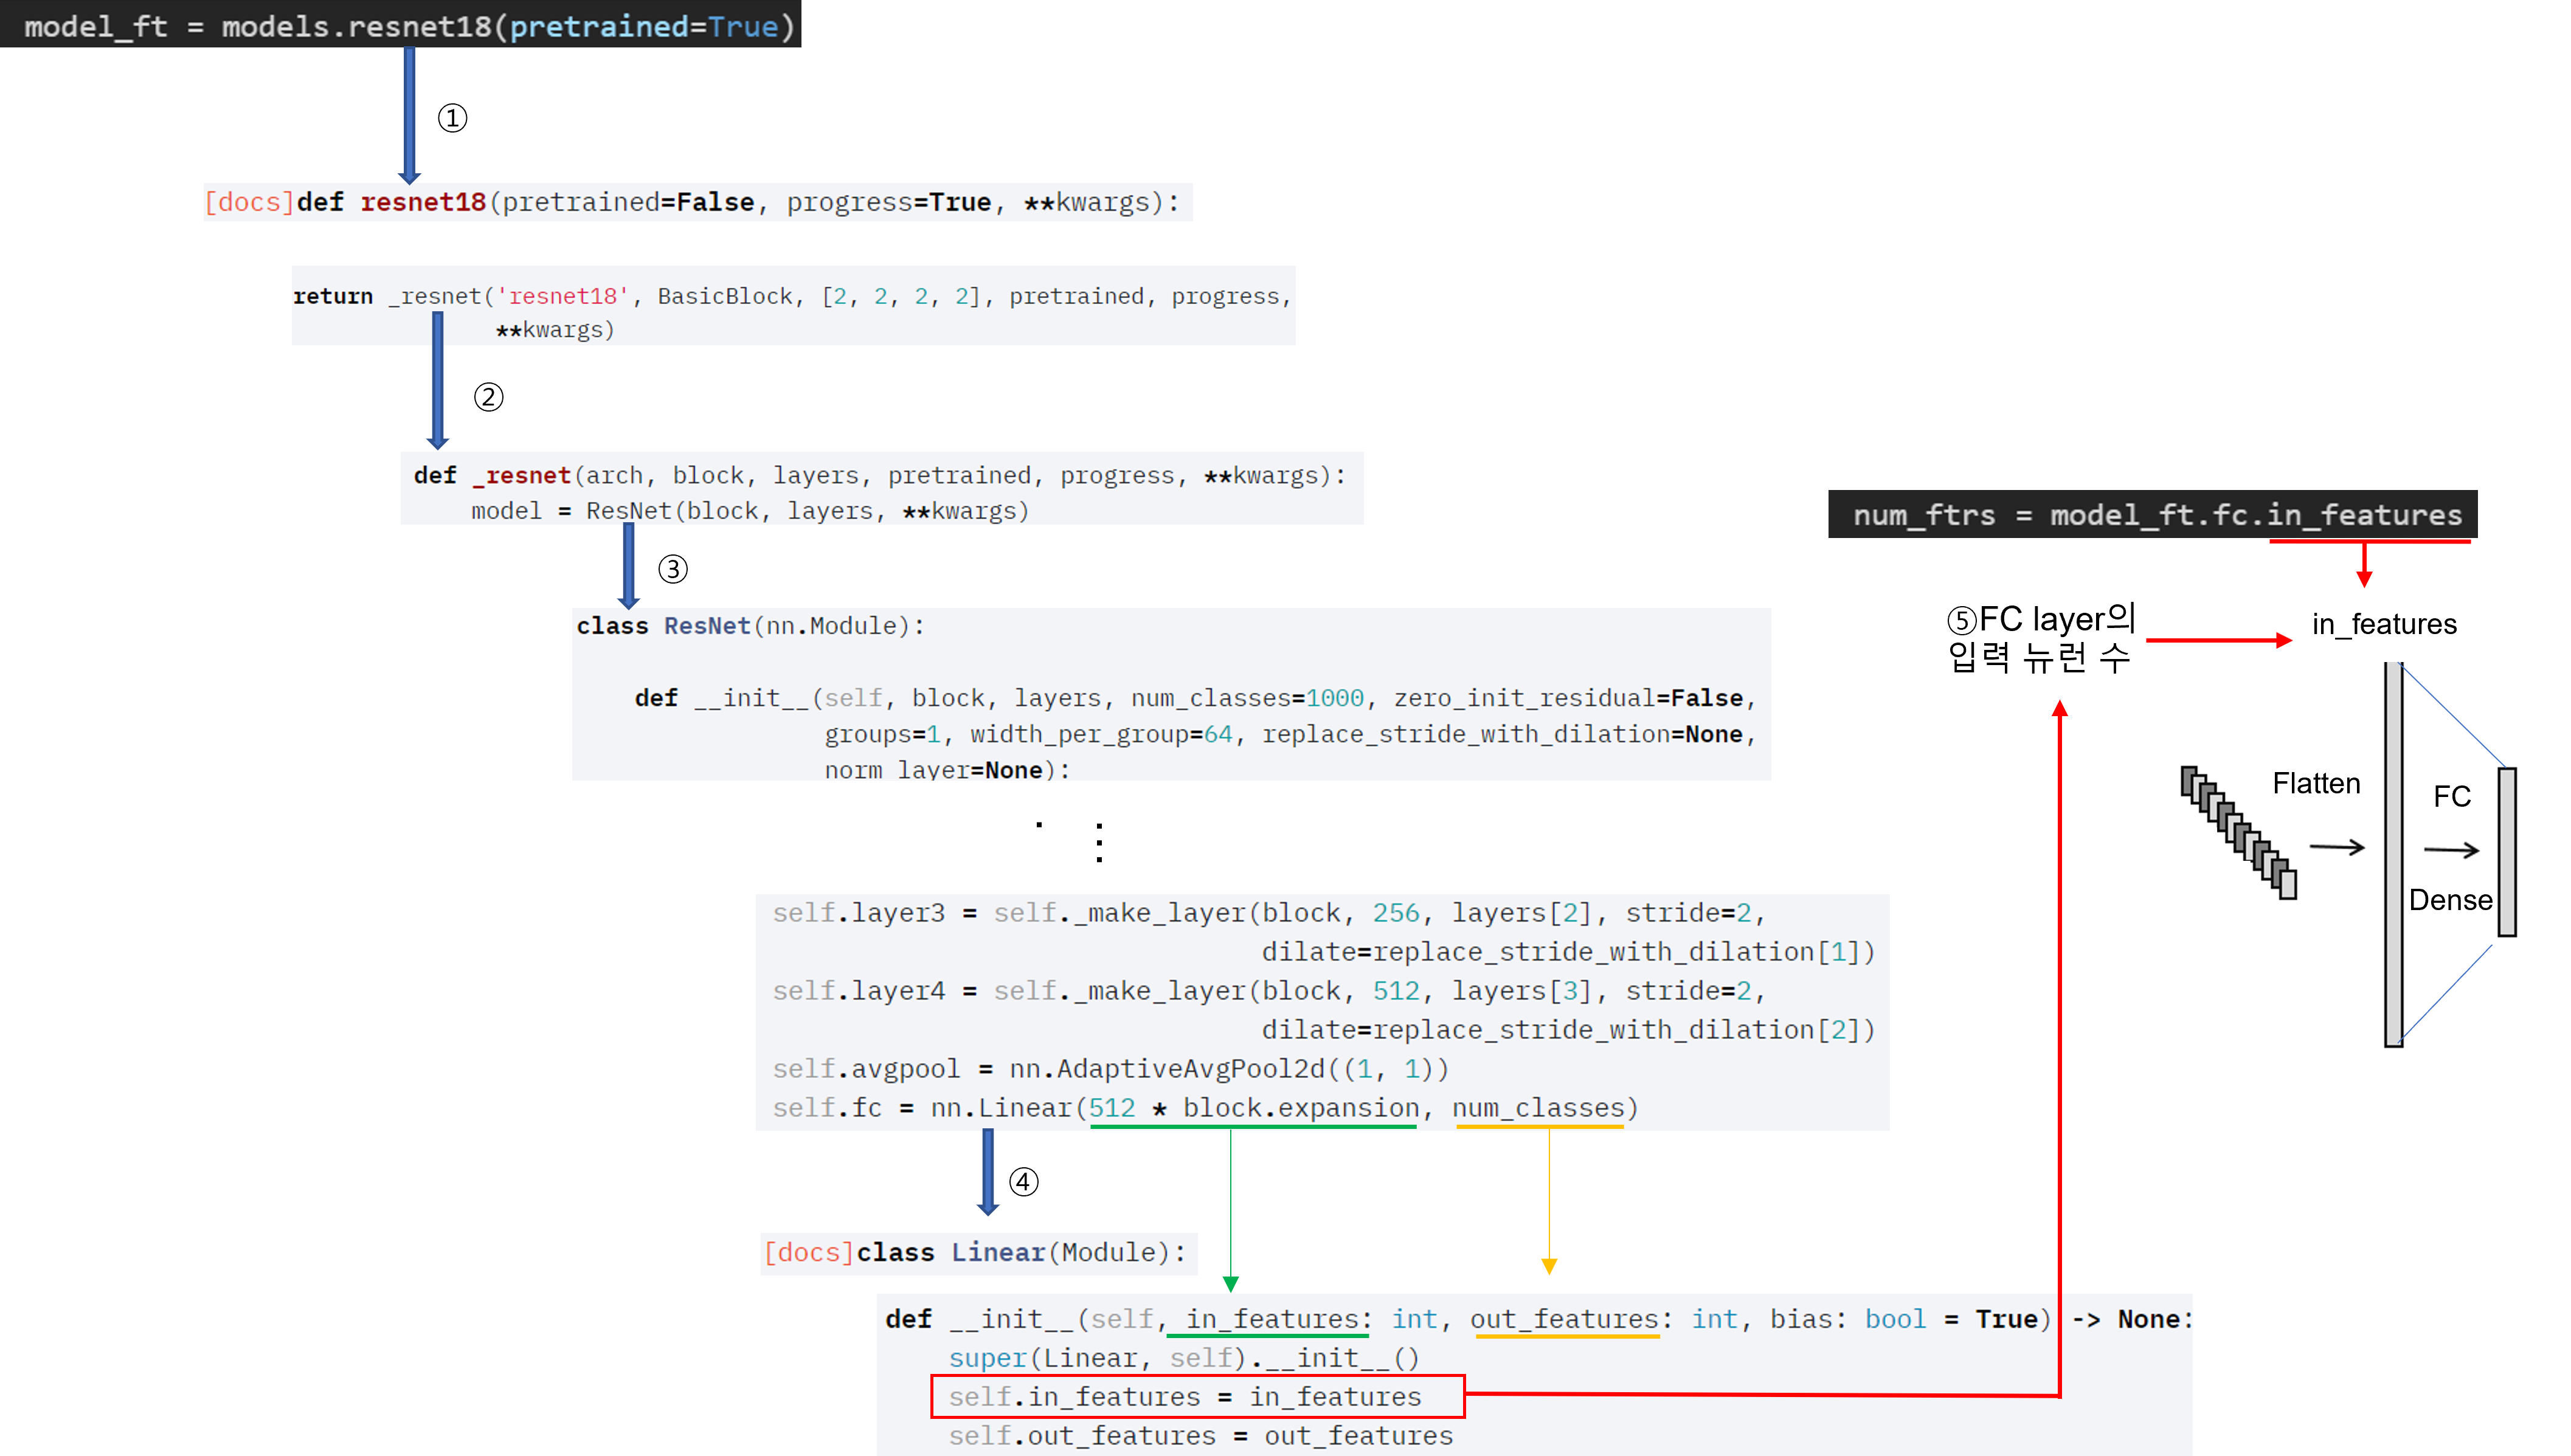
아래 parameters를 보면 알 수 있듯이 pre-trained model은 ImageNet을 기반으로 하고 있는걸 확인할 수 있습니다. 만약 "pretrained=False"로 설정하면 resnet18 모델만 사용할 수 있게 됩니다 (=Conv filter가 학습이 되지 않은 초기화 상태)

2. FC layer 수정해주기
앞서 Pre-trained model을 다운 받았으니 내가 사용할 task에 맞게 FC layer를 변경해주어야 합니다.
import torch.nn as nn
num_ftrs 가 의미하는 바는 아래와 같습니다.
(↓↓↓ResNet 구현된 API↓↓↓)
https://pytorch.org/vision/stable/_modules/torchvision/models/resnet.html#resnet18
torchvision.models.resnet — Torchvision 0.10.0 documentation
Shortcuts
pytorch.org
"1.Data Load (Feat.CUDA)" 글에서 class_names는 폴더에 있는 클래스 명들을 담고 있다고 했습니다. 만약 분류해야할 클래스가 5개이면 해당 폴더도 5가지로 구성되어 있으니, len(class_name)을 적용하면 5라는 값이 출력 될 것입니다.

3. Fine-tuning 정도 정해주기 (Feat. freezing)
Transfer learning을 적용할 때 상황에 따라 어느 layer까지 학습 가능하게 할지 고려해주어야 합니다.
(↓↓↓Transfer learning을 적용할 때 고려해야할 상황 4가지↓↓↓)
https://89douner.tistory.com/67
11. Transferlearning (Feat. fine-tuning)
안녕하세요 이번 글에서는 Transfer learning에 대해서 설명해보려고 합니다. 먼저 transfer learning이 무엇인지 설명을 드리는것이 맞으나 이번 글에서는 transer learning을 적용할 때 고려해야할 상황에
89douner.tistory.com
Freezing 정도를 pytorch에서는 어떻게 설정해주는지 글로 쓰려고 했는데, 따로 정리한 PPT에 설명이 잘되어 있어서 아래 PPT 자료로 설명을 대체하겠습니다. (파일 용량이 10MB 이상 업로드가 안돼서 디자인도 바꾸고 중간중간 슬라이드 부분도 제거해버렸네요 ㅜㅜ)
또한 특정 layer의 conv filter 또는 batch normalization의 beta, gamma 값을 초기화(initialization) 해주어야 할 때도 있습니다. 이러한 경우 어떻게 초기화 시키면 되는지 또한 PPT 자료로 정리해놨으니 참고해주시면 감사하겠습니다 (파일 용량이 10MB 이상 업로드가 안돼서 디자인도 바꾸고 중간중간 슬라이드 부분도 제거해버렸네요 ㅜㅜ)
(↓↓↓batch norm gamma, beta 초기화 필요성을 언급한 논문↓↓↓)
https://89douner.tistory.com/248?category=908624
2. Bag of Tricks for Image Classification with Convolutional Neural Networks
안녕하세요. 이번 글에서는 아래 논문을 리뷰해보도록 하겠습니다.(아직 2차 검토를 하지 않은 상태라 설명이 비약적이거나 문장이 어색할 수 있습니다.) ※덧 분여 제가 medical image에서 tranasfer l
89douner.tistory.com
3. Model을 GPU에 업로드 하기
학습하기 위해 모델 구축을 마무리 했습니다. 그럼 실제 학습을 위해 이제부터 딥러닝 model을 GPU에 올려놓도록 하겠습니다.
아직 model을 GPU에 올리기 전 상태이기 때문에, nvidia-smi를 통해 GPU 메모리를 확인하면 대략 500MiB의 메모리가 다른 OS 관련 process를 잡고 있는걸 볼 수 있습니다. (GPU-Util (=GPU 이용율) 부분도 3%이므로 GPU가 거의 쉬고 있다고 보시면 됩니다)

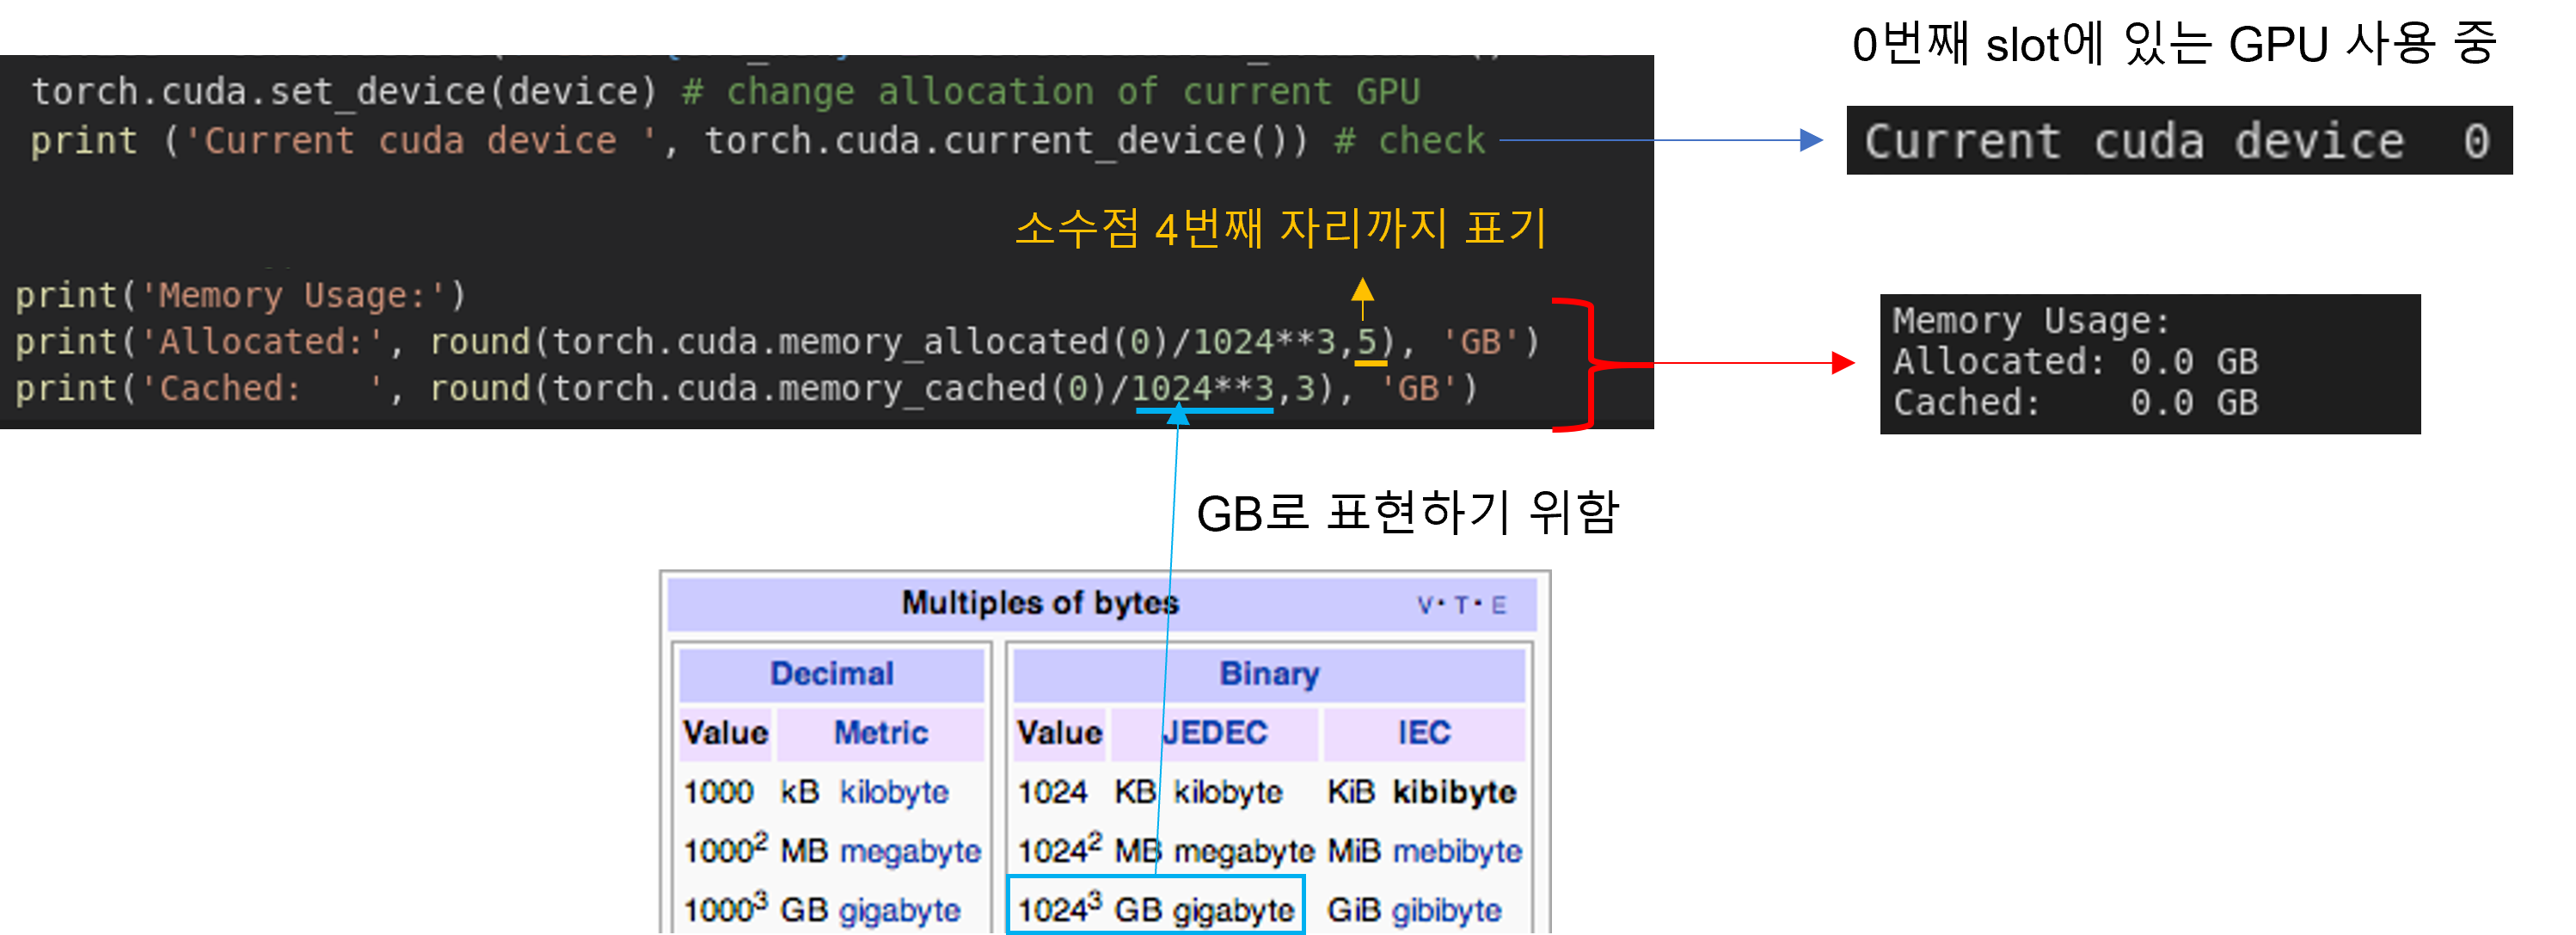
아래와 같이 코드를 수행해도 GPU 상의 메모리를 확인할 수 있는데, 아래 코드를 이용하면 아무런 메모리도 올라가 있지 않다는걸 확인할 수 있습니다. torch 관련한 코드로 GPU 메모리를 확인하면 torch 코드로 GPU 상에 데이터를 업로드 하지 않은 이상 GPU 메모리 용량이 0으로 표현되는듯 합니다.
이번엔 아래 코드를 수행하여 딥러닝 모델을 GPU에 업로드 하고, GPU 메모리를 확인해 보도록 하겠습니다.

- model.to(device): When loading a model on a GPU that was trained and saved on GPU, simply convert the initialized model to a CUDA optimized model using model.to(torch.device('cuda')).
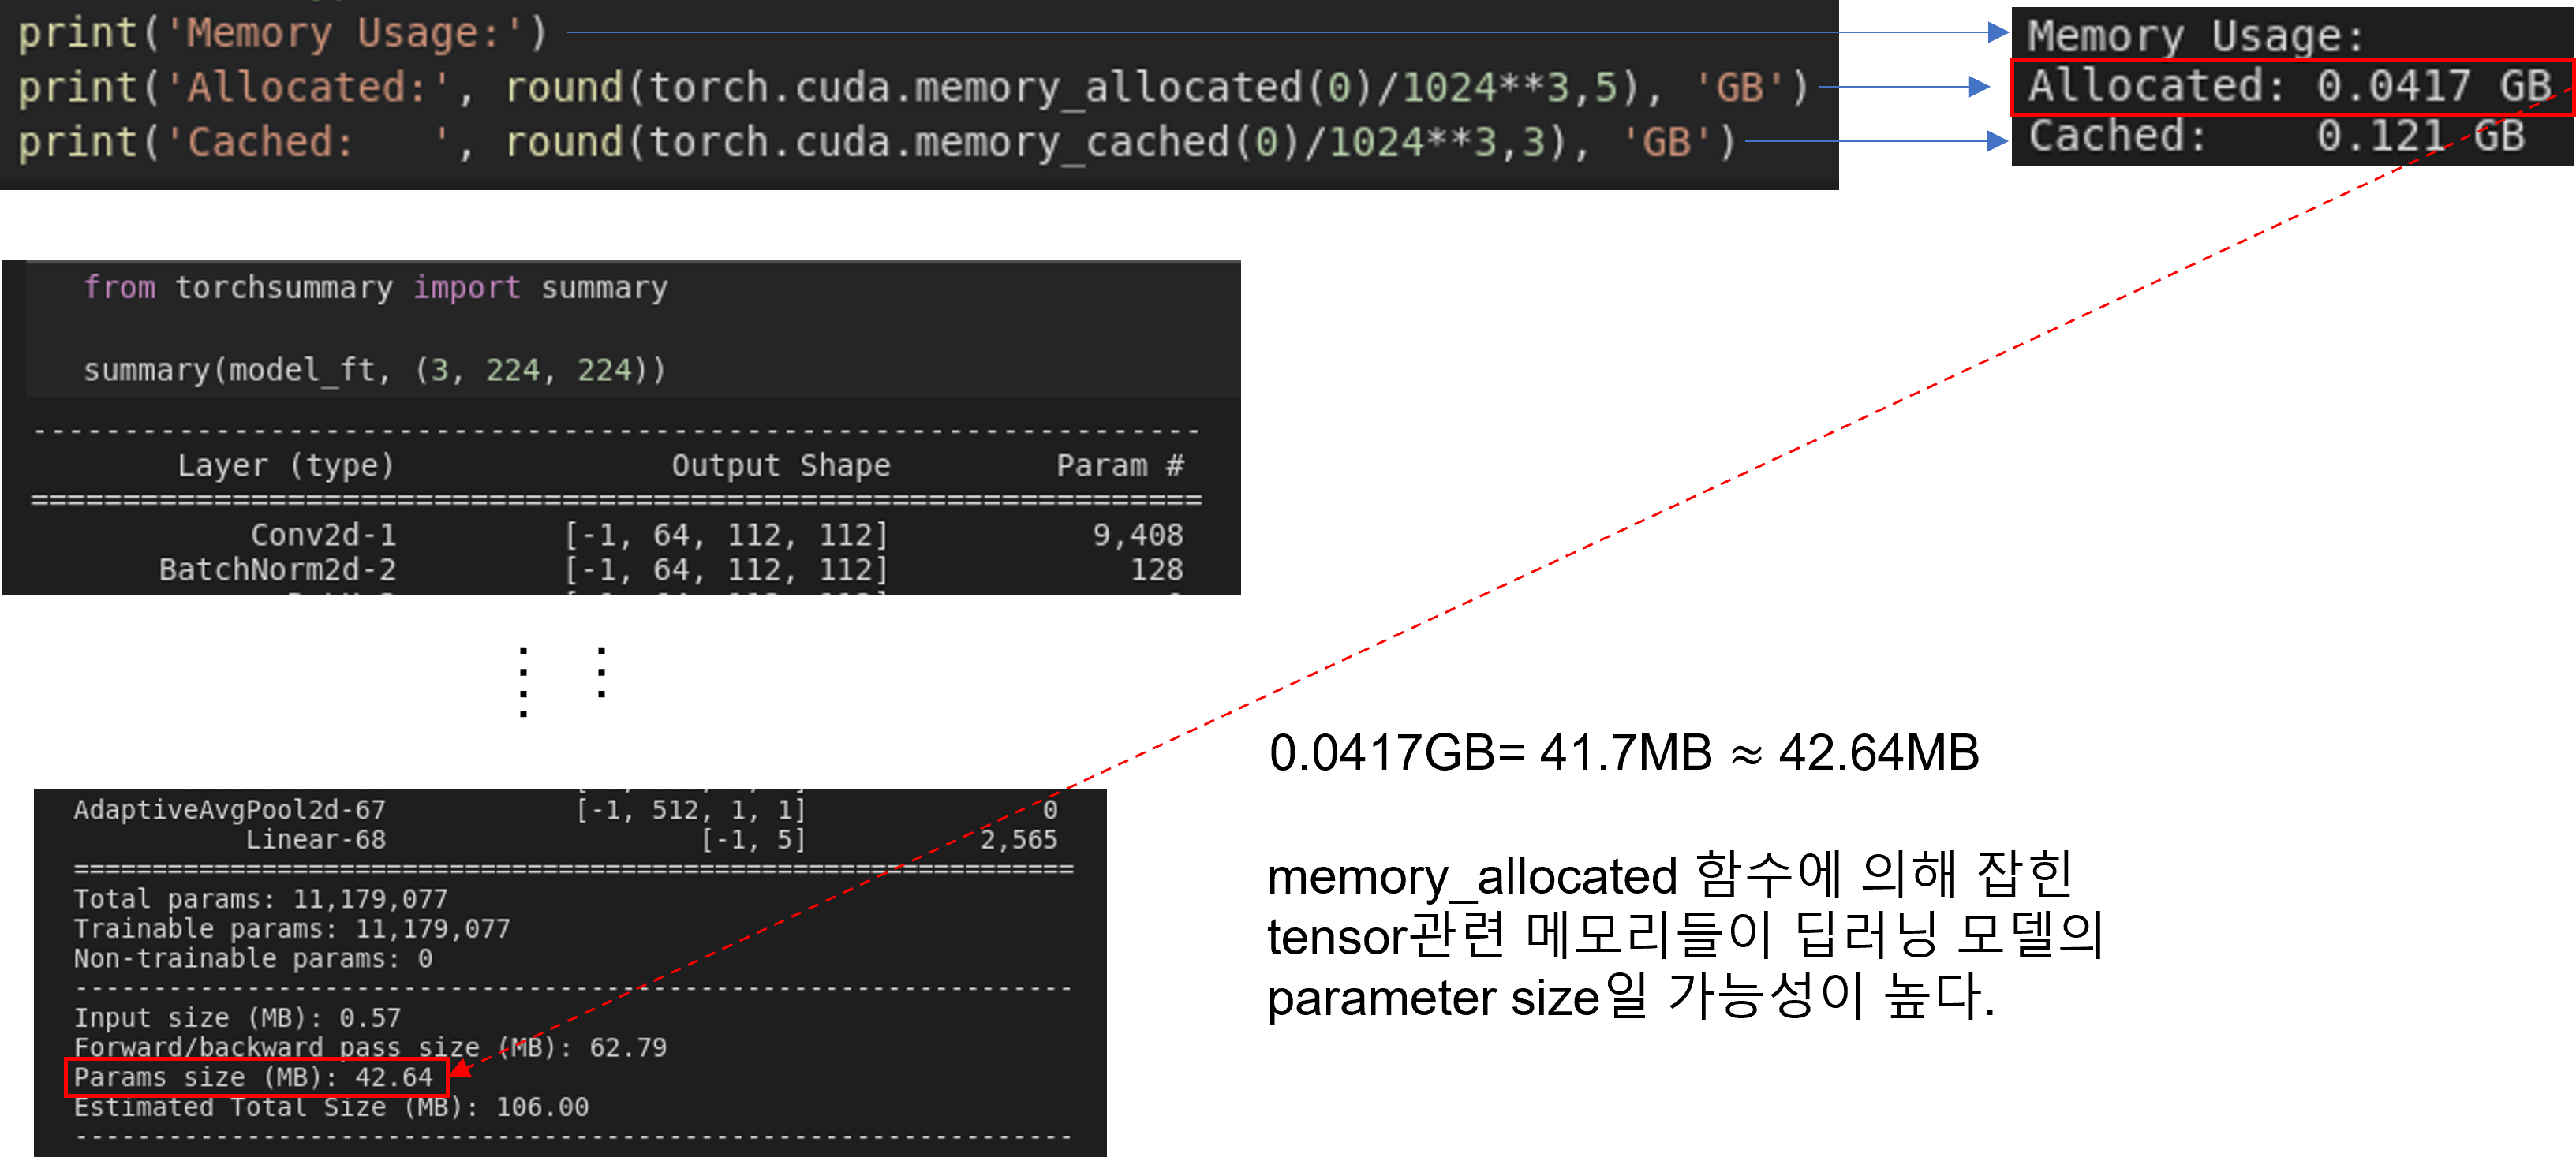
- torch.cuda.memory_allocated 설명
- You can use memory_allocated() and max_memory_allocated() to monitor memory occupied by tensors, and use memory_reserved() and max_memory_reserved() to monitor the total amount of memory managed by the caching allocator.
- torch.cuda.memory_cached 설명
- PyTorch uses a caching memory allocator to speed up memory allocations.
- This allows fast memory deallocation without device synchronizations.
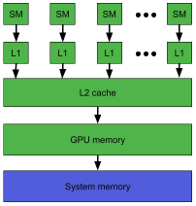
- However, the unused memory managed by the allocator will still show as if used in nvidia-smi.
- The nvidia-smi number includes space the allocated by the CUDA driver when it loads PyTorch.
- This can be quite large because PyTorch includes many CUDA kernels. On a P100, I’ve seen an overhead of ~487 MB.
- This memory isn’t reported by the torch.cuda.xxx_memory functions because it’s not allocated by the program and there isn’t a good way to measure it outside of looking at nvidia-smi.
- Our tensor is too small. The caching allocator allocates memory with a minimum size and a block size so it may allocate a bit more memory than the number of elements in your tensors.
- Things like cuda ctx, cuda rng state, cudnn ctx, cufft plans, and other gpu memory your other libraries may use are not counted in the torch.cuda.* stats.

지금까지 배운 내용(1.Data load(Feat. CUDA), 2.Data Preprocessing(Feat. Augmentation))을 코드로 요약 하면 아래와 같습니다.
# License: BSD
# Author: Sasank Chilamkurthy

from __future__ import print_function, division

import torch
import torch.nn as nn
import torch.optim as optim
from torch.optim import lr_scheduler
import numpy as np
import torchvision
from torchvision import datasets, models, transforms
import matplotlib.pyplot as plt
import time
import os
import copy

plt.ion()   # interactive mode
# Data augmentation and normalization for training
# Just normalization for validation
data_transforms = {
'train': transforms.Compose([
transforms.RandomResizedCrop(224),
transforms.RandomHorizontalFlip(),
transforms.ToTensor(),
transforms.Normalize([0.485, 0.456, 0.406], [0.229, 0.224, 0.225])
]),
'val': transforms.Compose([
transforms.Resize(256),
transforms.CenterCrop(224),
transforms.ToTensor(),
transforms.Normalize([0.485, 0.456, 0.406], [0.229, 0.224, 0.225])
]),
}
data_dir = 'data/hymenoptera_data'
image_datasets = {x: datasets.ImageFolder(os.path.join(data_dir, x),
data_transforms[x])
for x in ['train', 'val']}
dataloaders = {x: torch.utils.data.DataLoader(image_datasets[x], batch_size=4,
shuffle=True, num_workers=4)
for x in ['train', 'val']}
dataset_sizes = {x: len(image_datasets[x]) for x in ['train', 'val']}
class_names = image_datasets['train'].classes
device = torch.device("cuda:0" if torch.cuda.is_available() else "cpu")def imshow(inp, title=None):
"""Imshow for Tensor."""
inp = inp.numpy().transpose((1, 2, 0))
mean = np.array([0.485, 0.456, 0.406])
std = np.array([0.229, 0.224, 0.225])
inp = std * inp + mean
inp = np.clip(inp, 0, 1)
plt.imshow(inp)
if title is not None:
plt.title(title)
plt.pause(0.001) # pause a bit so that plots are updated
# Get a batch of training data
inputs, classes = next(iter(dataloaders['train']))
# Make a grid from batch
out = torchvision.utils.make_grid(inputs)
imshow(out, title=[class_names[x] for x in classes])model_ft = models.resnet18(pretrained=True)
num_ftrs = model_ft.fc.in_features
# Here the size of each output sample is set to 2.
# Alternatively, it can be generalized to nn.Linear(num_ftrs, len(class_names)).
model_ft.fc = nn.Linear(num_ftrs, 2)
model_ft = model_ft.to(device)
다음 글에서는 딥러닝 모델이 학습할 방향성을 결정해주는 loss function, optimizer, learning rate schedule 에 대해서 알아보도록 하겠습니다.
(↓↓↓ 다음 글에서 배울 코드내용↓↓↓)
criterion = nn.CrossEntropyLoss()

# Observe that all parameters are being optimized
optimizer_ft = optim.SGD(model_ft.parameters(), lr=0.001, momentum=0.9)

# Decay LR by a factor of 0.1 every 7 epochs
exp_lr_scheduler = lr_scheduler.StepLR(optimizer_ft, step_size=7, gamma=0.1)'Pytorch > 2.CNN' 카테고리의 다른 글
| 5.Loss function, Optimizer, Learning rate policy (0) | 2021.07.27 |
|---|---|
| 3. CNN 구현 (2) | 2021.07.27 |
| 2. Data preprocessing (Feat. Augmentation) (0) | 2021.07.27 |
| 1. Data Load (Feat. CUDA) (0) | 2021.07.27 |
| 코드 참고 사이트 (0) | 2021.07.02 |